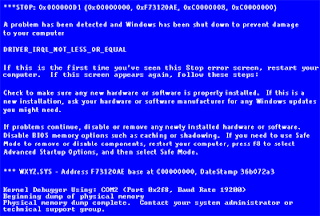
 Blue screen of death (BSOD, Bahasa Inggris: Layar Biru Kematian), atau kadang disebut “layar biru” (bluescreen) saja adalah istilah populer untuk layar yang ditampilkan Microsoft Windows ketika mengalami kesalahan sistem (atau disebut stop error oleh Microsoft). BSOD milik Windows NT, 2000, XP, atau Vista biasanya lebih serius daripada Windows sebelumnya. Ada beberapa hal yang menyebabkan munculnya BSOD ini. Diantaranya driver peralatan yang tidak bagus, kesalahan memori, registry yang rusak atau penggunaan file DLL yang tidak cocok.
 Berbagai bentuk BSOD terdapat pada seluruh sistem operasi Windows sejak Windows 3.1. BSOD merupakan pengganti black screen of death (layar hitam kematian) yang muncul pada OS/2 dan MS-DOS.[1] Dalam versi awal dari Windows Vista juga terdapat red screen of death atau layar merah kematian, yang digunakan pada kesalahan boot loader.
Seprti inlah layar yang sedang terkena bluescreen:
Sekarang saya akan membahas bagaimana cara mengatasinya dengan cara yang sederhana.. Saya mengalami sendiri masalah ini, dan lumayan bikin kesel juga.. yah, tapi dengan sedikit usaha yah dapet deh caranya. OK, kita mulai aja.. yang kita perluin disini cuma satu tools kecil yang namanya bluescreenview bisa didownload disini
pertama-tama yang perlu kita lakuin adalah masuk ke dalam safe mode windows (untuk yang belum tau caranya masuk ke safe mode, ketika komputer baru nyala tekan tombol F8).
 setelah masuk dan login ke safe mode, ekstrak file yang sudah kita download barusan. setelah jalan, maka akan didapat tampilan berikut ini,
 Disitu bisa dilihat ada satu file .dmp yang berarti pernah terjadi masalah BSoD ini sebelumnya. klik file tersebut, maka akan kita dapat keterangan lebih lanjutnya..
 apabila diklik 2 kali, maka akan keluar detail dari penyebab mengapa terjadi BSoD itu,
 disitu dapat dilihat bug check string, driver yang menyebabkan terjadinya BSoD tersebut, dan alamat dari driver tersebut. dengan bantuan paman google, kita bisa mencari tahu apa dan siapa si sptd.sys itu.
dari hasil pencarian farin, didapat kalo driver sptd.sys itu digunakan untuk virtual harddisk atau daemon yang digunakan untuk meload file .ISO dikomputer.
Dari sini ketahuan kan apa yang mesti kita lakukan?.., yup, uninstall ataupun mematikan service yang menggunakan driver ini.
fitur lain dari tools ini bisa juga untuk melihat priview dari BSoD yang terjadi,
 Satu hal penting lainnya adalah, bagaimana mengaktifkan BSoD ini apabila ada kesalahan dalam windows bisa baca dibawah ini :
How to configure Windows to create MiniDump files on BSOD
BlueScreenView utility allows you to watch the blue screen crashes occurred in your system by reading and analyzing the MiniDump files created on every crash by the operating system. The MiniDump files are usually created under C:\WINDOWS\Minidump, unless the path was modified in the system failure settings of Windows.
In most systems, Windows is already configured to create these MiniDump files as the default system failure configuration.
However, if from some reason MiniDump files are not created in your system during a blue screen crash, you should follow the instructions below in order to configure Windows to create them.
1). Right-click on the 'My Computer' icon and choose 'Properties'. Alternatively, you can also go to Control Panel and open the 'System' applet.
2). In the opened window, click the 'Advanced' tab and then inside the 'Startup And Recovery' frame, click the 'Settings' button.
In most systems, Windows is already configured to create these MiniDump files as the default system failure configuration.
However, if from some reason MiniDump files are not created in your system during a blue screen crash, you should follow the instructions below in order to configure Windows to create them.
For Windows XP:
1). Right-click on the 'My Computer' icon and choose 'Properties'. Alternatively, you can also go to Control Panel and open the 'System' applet.
2). In the opened window, click the 'Advanced' tab and then inside the 'Startup And Recovery' frame, click the 'Settings' button.
 3). In the opened 'Startup And Recovery' window, there is 'Write Debugging Information' section. You should set the combo-box in this section to 'Small memory dump', and then click 'ok' to confirm the change.
- Go to the Control Panel, choose 'System And Security', and then click 'System', and then click the 'Advanced System Settings' link.
- In the opened window, click the 'Advanced' tab and then inside the 'Startup And Recovery' frame, click the 'Settings' button.
- In the opened 'Startup And Recovery' window, there is 'Write Debugging Information' section. You should set the combo-box in this section to 'Small memory dump', and then click 'ok' to confirm the change.
You can also make this MiniDump change in the Registry, by setting the following value:
Windows Registry Editor Version 5.00[HKEY_LOCAL_MACHINE\SYSTEM\CurrentControlSet\Control\CrashControl]
"CrashDumpEnabled"=dword:00000003
However, be aware that this Registry change affects the system only after reboot.


